
What Is a Workflow in Approveit?
In today’s fast-paced business environment, optimizing processes is no longer optional — it’s essential. Whether you’re managing purchase approvals, onboarding workflows, or any other recurring task, Approveit offers a powerful no-code workflow automation platform that simplifies and accelerates your operations. In this step-by-step guide, you'll learn how to create a workflow in Approveit using our intuitive workflow builder and unlock the full potential of workflow automation software.
A workflow in Approveit is a structured process that automates how requests move through your organization. It includes defined steps, responsible parties, conditional logic, and smart intake forms that make routing and approvals seamless.
Think of it as the digital version of your business process — but faster, more accurate, and fully automated. From collecting requests to final approvals, each step can be configured in just a few clicks, with no coding required.
Why Use Approveit for Workflow Automation
Approveit is more than just a tool — it’s a complete workflow automation software solution designed for teams that want to move faster and with more confidence.
Key Benefits:
No-code workflow automation: Build and launch workflows without developer support.
Automated workflow setup: Customize routing, steps, and conditions with ease.
Cross-platform approvals: Approve directly in Slack, Microsoft Teams, or via email.
Transparency and tracking: Monitor every step of your workflow approval process.
Integrations: Connect with Google Workspace, Slack, Jira, and more.
Common Use Cases for Workflow Automation in Approveit
Whether you're a startup or an enterprise, there are countless ways to use Approveit to streamline your operations:
Procurement workflows: Automate purchase order and vendor approvals.
HR workflows: Streamline onboarding and offboarding.
Finance workflows: Manage budget approvals and expense reporting.
IT and security: Set up access requests and software approvals.
Marketing workflows: Coordinate campaign approvals, creative requests, and content scheduling.
Sales workflows: Automate deal desk approvals, custom discount requests, and CRM updates.
Legal workflows: Route contracts for review and approval with proper documentation.
Time-off requests: Handle leave approvals with visibility into team availability.
Compliance and audits: Ensure critical steps are tracked and documented automatically.
Facilities management: Approve maintenance requests, office supply needs, and asset tracking.
By using Approveit workflows, you remove bottlenecks and manual follow-ups, improving efficiency and reducing risk.
How to Create a Workflow in Approveit
Ready to get started? Follow these steps to create workflow Approveit style.
To create your approval workflow, you need to go to the “Workflow” tab in the left-side menu and click the “New workflow” button that appears on your screen.

Next, you’ll be asked to choose the approval form template that suits your use case. Select the use-case. For example, select Accounts payable → Bill approval.

Add external data source. Activate the option of adding external data source for an action outside of Approveit to trigger an approval request.

Choose external data source. You can use Zapier or Apporveit API to trigger an approval request when a particular event happens outside of Approval.

Click Edit form fields. Specify the approval form that requestors will be filling to create an approval request.

Mandatory fields can not be deleted. There are some fields that are mandatory and therefore can not be deleted, but can be reordered.

Additional fields. Additional fields can be added by selecting the needed field from the right panel.

Specify the name of the field. Once the field is added, the field has to be named.

Add the options. Add the options that will be available for a requestor to specify.

Working with dynamic fields. Add a field that should appear only if a particular option is selected on the previous steps (dynamic field). For example, let’s add the text Single-line field that should appear only if the Expense type is Fixed.

Click on the Dynamic field sign.

Specify the conditions when the field should appear.

Specify the conditions when a field should appear.

Click on Done. Save the created form.

Want to learn more? Explore our Smart Intake Forms Guide to build even more powerful Approveit workflows.
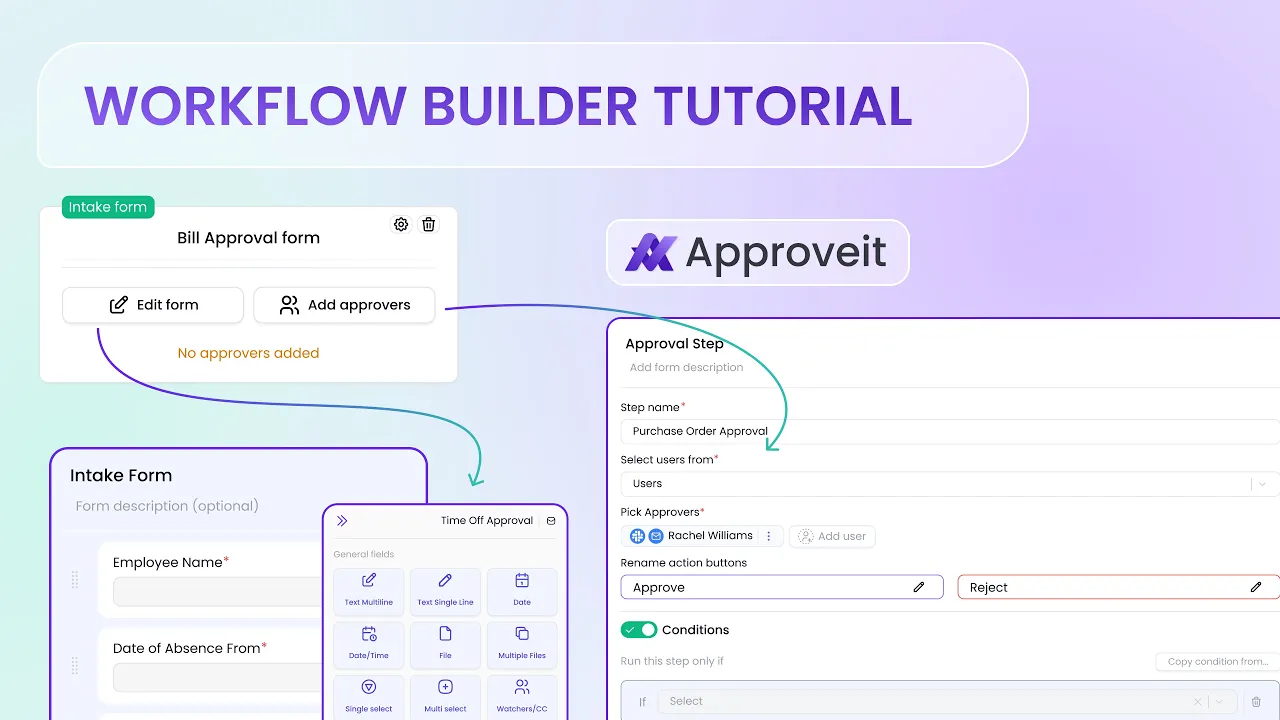
Click on Add approvers. To specify the approval flow, click Add approvers.

Rename the first approval step

Specify the approvers for the first step.

Add one more approval step.

Name the second step. Type “Finance approval,” for example.

Specify approvers for the second step.

Add the third approval step.

Name the third step.

Turn on conditions for the third step. If the Conditions are activated for the step, then the step runs only if the Conditions are met.

Specify the conditions.

Specify the approvers for the third step.

Click on Show Flow. To view the approval flow, click Show Flow.

Click on Done. Save the approval flow by clicking Done.

Want to learn more? Explore our Conditional Logic Guide to build even more powerful Approveit workflows.
Click Settings.

Rename the workflow stage and activate the needed options.

Activate post-approval integration. To activate a post-approval action (like sending an email upon approval or creating a row in a specified table in Google Sheets) click ‘Send requests data to’.

Click on Send requests data to…
An email can be sent upon approval to a specified email address.
An action may be performed via Zapier (for example, a new row can be created in the table in Google Sheets).

Click on Workflow Settings.

Add labels for the workflow.

Click on Access. Limit access to specific team members.

Congrats! You've just created an automated workflow that will save your team hours every week.
💡 Tips for Optimizing Your Business Process Automation
To get the most out of Approveit’s business process automation capabilities, consider the following best practices:
Use smart conditions: Automate routing based on field values.
Start simple: Launch with a core process and iterate.
Leverage integrations: Connect tools your team already uses.
Regularly review workflows: Optimize steps based on performance.
Train your team: Ensure everyone understands how to use the system effectively.
With Approveit’s intuitive workflow builder, you don’t need to write a single line of code to streamline your operations. Whether you’re setting up procurement approvals or onboarding sequences, our platform empowers you to take full control of your processes with no-code workflow automation.
Get started today and take the first step toward scalable team workflow automation.
If you have any questions or need further assistance, feel free to reach out to our
support team.


