
Why Use Zapier with Approveit for Outbound Automation?
Maximize the power of your approval workflows by automatically triggering actions in external systems after approvals in Approveit. This guide walks you through setting up outbound integrations with Zapier to automate post-approval tasks across your entire tech stack.
Connecting Approveit to Zapier for outbound automation delivers significant benefits:
End-to-end workflow automation: Complete the full process cycle by automating actions after approvals
Eliminate manual follow-up tasks: Automatically update systems once approvals are complete
Reduce human error: Ensure consistent execution of post-approval actions
Save valuable time: Remove the delay between approval and implementation
Centralize workflow management: Keep Approveit as your process hub while extending its capabilities
No coding required: Create powerful integrations without technical expertise
Getting Started: Connecting Approveit to Zapier
Follow these steps to establish the connection between Approveit and Zapier.
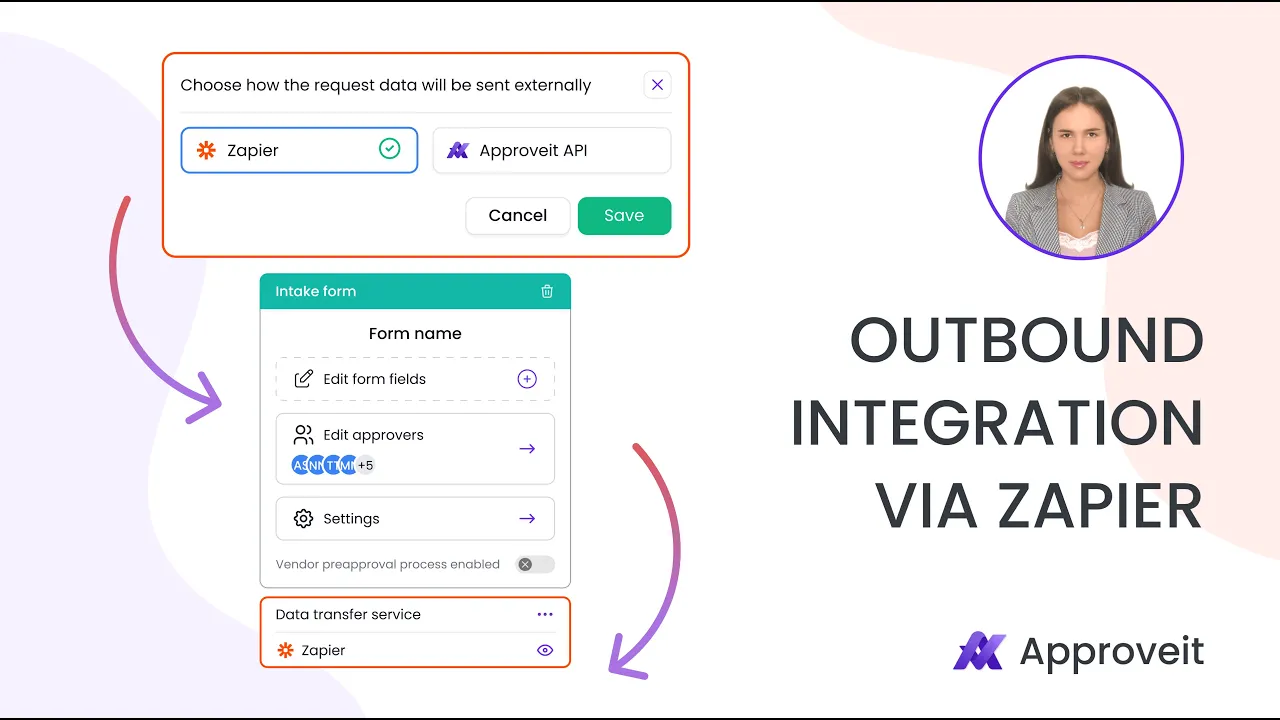
Create the workflow in Approveit. Go to the Workflows section and click on “New workflow”.

In the workflow builder click on Send requests data to.

Click on Zapier.

Click on Save.

Configure the workflow. Configure the fields that your requestors will be filling and specify approvers.

Save your workflow.

Create and approve an approval request using the created workflow.

Go back to the Workflows section and select the created workflow. Here you can view the needed API keys.

Here you can see your API workflow key that you will need later.

Create a new Zap in Zapier.

Select Approveit for the first step and select the trigger event.

Creating a Zap: Step-by-Step Setup
Connect your Approveit account.

Insert Approveit API key. Approveit API key can be found in Settings → Integrations → Zapier.

Insert the workflow API key. The workflow API key can be found in the workflow builder.

Test the step.

For the second step select the app you want to integrate with.

Click on Search and select an event.

Configure the mapping of fields.

Test the second step.

Publish your Zap.

Create an approval request in Approveit and wait for the approval.

Check the app that you integrated with via Zapier. In our case, we can see that the new row was created in Google Sheets upon the request approval in Approveit.

Popular Use Cases for Approveit + Zapier
Explore these powerful automation scenarios to streamline your business processes:
Document Management
After document approval in Approveit, automatically:
Save final documents to Google Drive, Dropbox, or OneDrive
Generate PDFs and store them in designated folders
Update document metadata to reflect approval status
Team Communication
When workflows complete, instantly:
Send notifications to Slack or Microsoft Teams channels
Update project boards in Trello, Asana, or Monday.com
Create calendar events for implementation phases
Customer and Vendor Management
Following approval processes, automatically:
Create or update records in your CRM (Salesforce, HubSpot)
Generate and send contracts through DocuSign or Adobe Sign
Update customer status in your support platform
Financial Operations
After financial approvals, seamlessly:
Create invoices in accounting software like QuickBooks or Xero
Update budget tracking spreadsheets in Google Sheets
Send payment notifications to finance team members
HR Processes
When HR requests are approved:
Update employee records in HRIS systems
Schedule onboarding sessions in calendar applications
Provision access to systems through identity management platforms
By implementing these outbound integrations, you transform Approveit from a standalone approval system into a central automation hub that orchestrates actions across your entire organization.
For information on triggering Approveit workflows from external applications, check out our complementary guide on How to Trigger Approveit Workflows via Zapier.
If you have any questions or need further assistance, feel free to reach out to our
support team.


